15 Fruity Summer Desserts to Satisfy Your Sweet Tooth
When the sun’s out and the temps are climbing, nothing hits the spot like a cool, refreshing dessert. These summer sweets are packed with bright, fruity flavors and light, creamy textures that keep things feeling fun and easy—not heavy or overly rich.
From chilled pies and no-bake cheesecakes to layered trifles and frozen treats, these recipes are simple enough for casual get-togethers but tasty enough to wow your friends and family. You’ll be baking, blending, and assembling with the season’s best berries, citrus, melons, and more.
So grab your mixing bowls and a few fresh ingredients—these summer desserts are ready to help you keep your cool and satisfy those sweet cravings all season long!
Strawberry Shortcake
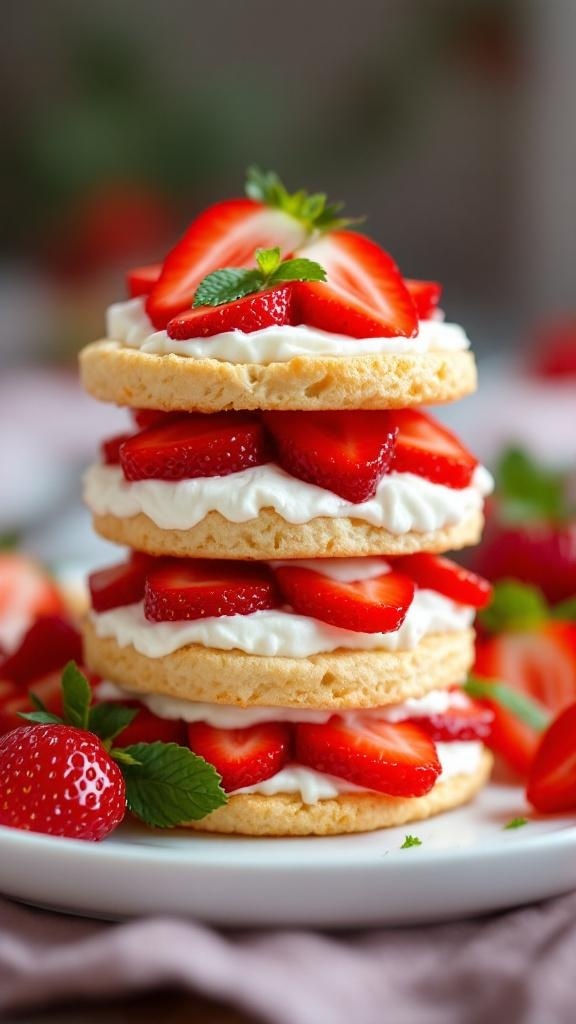
Strawberry shortcake is a delightful summer treat that combines sweet strawberries, fluffy whipped cream, and tender cake. This dessert is light and refreshing, making it perfect for warm days. Plus, it’s simple to whip up, so you can enjoy it without spending hours in the kitchen.
The layers of cake and strawberries create a beautiful presentation, and the taste is a perfect balance of sweetness and creaminess. Whether you’re hosting a gathering or just treating yourself, this dessert is sure to impress!
Ingredients
- 2 cups all-purpose flour
- 1/4 cup granulated sugar
- 1 tablespoon baking powder
- 1/2 teaspoon salt
- 1/2 cup unsalted butter, cold and cubed
- 1 cup heavy cream
- 1 teaspoon vanilla extract
- 4 cups fresh strawberries, sliced
- 1/4 cup powdered sugar (for strawberries)
- 1 cup heavy cream (for whipped cream)
- 1/4 cup powdered sugar (for whipped cream)
- 1 teaspoon vanilla extract (for whipped cream)
Instructions
- Preheat the oven to 425°F (220°C). In a large bowl, mix flour, granulated sugar, baking powder, and salt.
- Add the cold butter and mix until the mixture resembles coarse crumbs. Stir in the heavy cream and vanilla extract until just combined.
- Turn the dough onto a floured surface and gently knead a few times. Roll out to about 1-inch thickness and cut into rounds.
- Place the rounds on a baking sheet and bake for 12-15 minutes until golden. Let cool.
- Meanwhile, mix sliced strawberries with powdered sugar and let sit for about 15 minutes to release juices.
- For the whipped cream, beat the heavy cream, powdered sugar, and vanilla extract until soft peaks form.
- To assemble, slice the baked shortcakes in half. Layer strawberries and whipped cream between the halves, then top with the other half and more strawberries and whipped cream on top.
Peach Cobbler
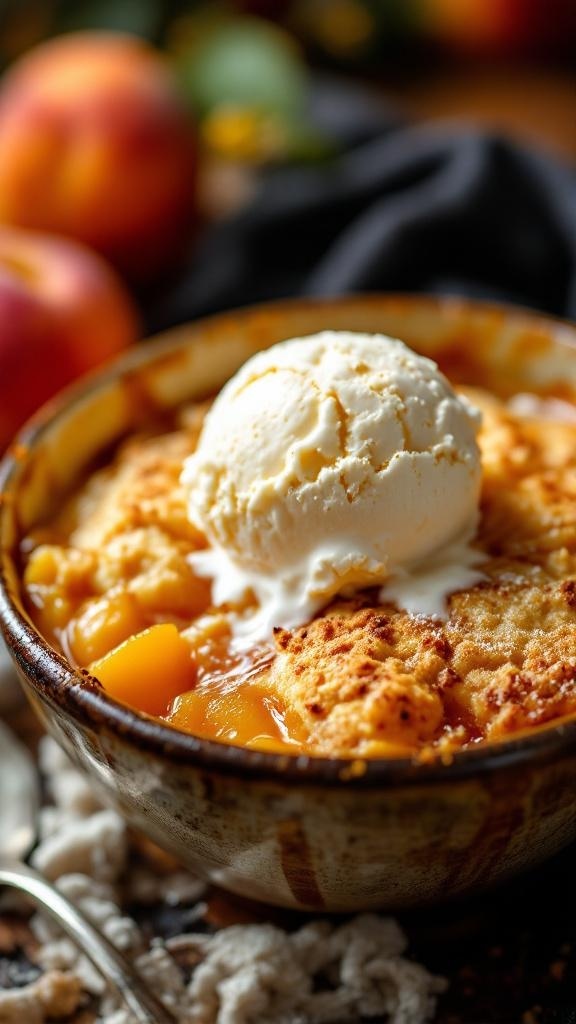
Peach cobbler is a classic summer dessert that brings the taste of fresh peaches right to your table. With its sweet, juicy fruit and a buttery, golden topping, it’s a treat that feels like a warm hug on a sunny day. This recipe is simple enough for anyone to make, whether you’re a seasoned baker or just starting out.
The combination of tender peaches and a crispy topping creates a delightful contrast that is hard to resist. Serve it warm with a scoop of vanilla ice cream on top, and you’ll have a dessert that’s perfect for any summer gathering.
Ingredients
- 4 cups fresh peaches, peeled and sliced
- 1 cup granulated sugar, divided
- 1 tablespoon lemon juice
- 1 teaspoon ground cinnamon
- 1 cup all-purpose flour
- 1 tablespoon baking powder
- 1/2 teaspoon salt
- 1 cup milk
- 1/2 cup unsalted butter, melted
Instructions
- Preheat your oven to 350°F (175°C). In a large bowl, mix the sliced peaches with 1/2 cup of sugar, lemon juice, and cinnamon. Pour this mixture into a greased baking dish.
- In another bowl, combine the flour, remaining sugar, baking powder, and salt. Stir in the milk and melted butter until just combined.
- Pour the batter over the peach mixture in the baking dish. Do not stir; the batter will rise during baking.
- Bake for 40-45 minutes, or until the top is golden brown and a toothpick inserted comes out clean.
- Let it cool slightly before serving. Enjoy warm, ideally with a scoop of vanilla ice cream!
Lemon Bars
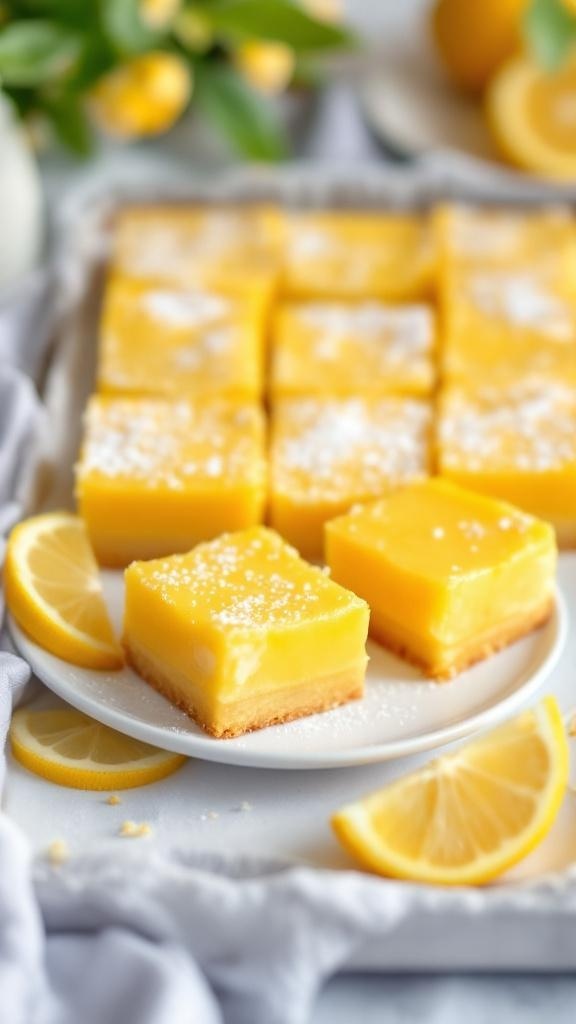
Lemon bars are a delightful treat that perfectly capture the essence of summer. With their bright, tangy flavor and a buttery crust, these bars are sure to refresh your taste buds. They are easy to make, requiring just a few simple ingredients, making them a great choice for both novice and experienced bakers.
The combination of sweet and tart in these lemon bars creates a delicious balance that is simply irresistible. Whether you’re hosting a summer gathering or just want a sweet snack, these bars are a fantastic option that everyone will love.
Ingredients
- 1 cup all-purpose flour
- 1/4 cup powdered sugar
- 1/2 cup unsalted butter, softened
- 1 cup granulated sugar
- 2 large eggs
- 1/4 cup fresh lemon juice
- 1 teaspoon lemon zest
- 1/2 teaspoon baking powder
- Pinch of salt
Instructions
- Preheat the oven to 350°F (175°C). Grease an 8×8-inch baking dish.
- Make the Crust: In a bowl, mix flour, powdered sugar, and softened butter until crumbly. Press the mixture into the bottom of the prepared baking dish.
- Bake the Crust: Bake for 15 minutes, or until lightly golden.
- Prepare the Filling: In a separate bowl, whisk together granulated sugar, eggs, lemon juice, lemon zest, baking powder, and salt until smooth.
- Pour the filling over the baked crust and return to the oven. Bake for an additional 20-25 minutes, or until the filling is set.
- Cool and Serve: Allow the lemon bars to cool completely before cutting into squares. Dust with powdered sugar before serving.
Watermelon Feta Skewers
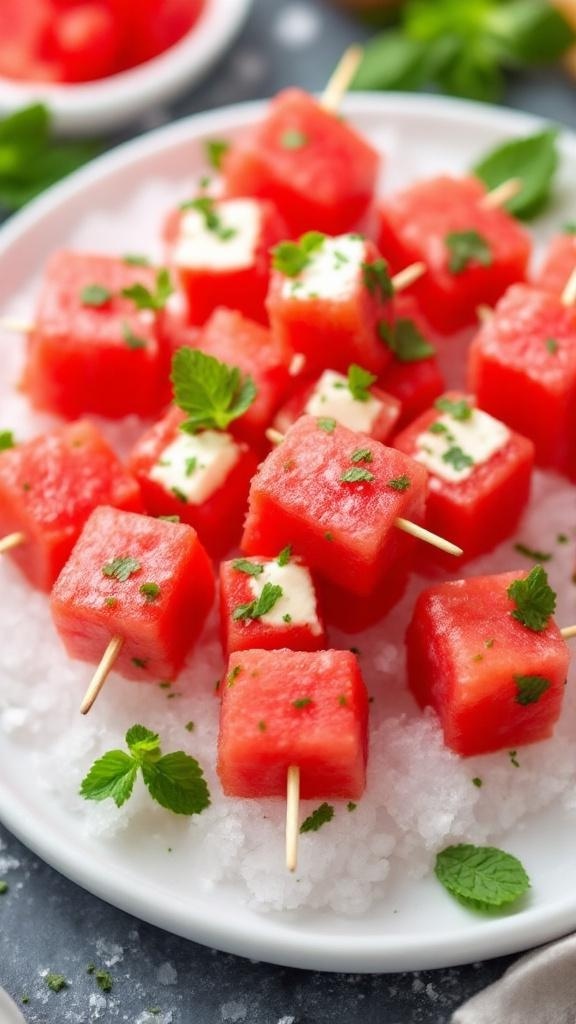
Watermelon feta skewers are a refreshing summer treat that combines the sweetness of juicy watermelon with the creamy saltiness of feta cheese. This simple recipe is perfect for hot days, offering a delightful contrast in flavors that will impress your friends and family.
Not only are these skewers easy to make, but they also look beautiful on a platter. With just a few ingredients, you can whip up a light and tasty snack that’s sure to be a hit at any summer gathering.
Ingredients
- 4 cups watermelon, cut into cubes
- 1 cup feta cheese, cut into small cubes
- Fresh mint leaves
- Salt and pepper to taste
- Skewers
Instructions
- Prepare the Skewers: Take a skewer and alternate threading a watermelon cube and a feta cube. Repeat until the skewer is filled, leaving some space at the ends for easy handling.
- Add Mint: Once all skewers are assembled, tuck a fresh mint leaf between the watermelon and feta on each skewer for added flavor.
- Season: Lightly sprinkle salt and pepper over the skewers to enhance the flavors.
- Serve: Arrange the skewers on a platter and enjoy immediately, or chill them in the refrigerator for a refreshing treat later.
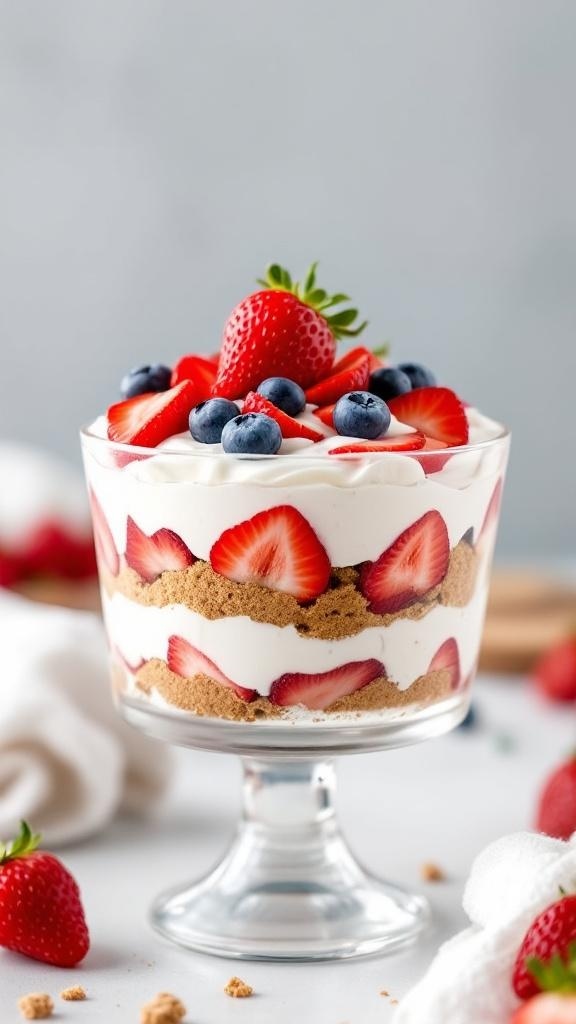
No-Bake Cheesecake Cups
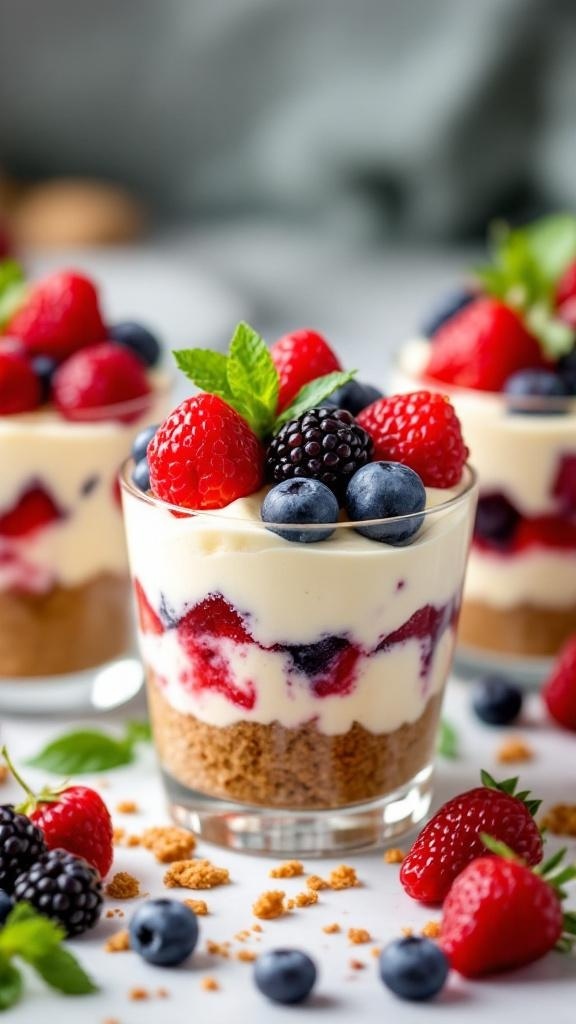
No-bake cheesecake cups are a delightful treat perfect for summer. They combine creamy cheesecake filling with fresh berries and a crunchy graham cracker base. This dessert is not only delicious but also super simple to whip up, making it an ideal choice for gatherings or a sweet ending to a warm day.
The taste is a perfect balance of sweet and tangy, with the berries adding a refreshing touch. Plus, you can prepare them in just a few minutes, letting them chill while you enjoy your day. It’s a fun and easy way to impress your friends and family!
Ingredients
- 1 cup graham cracker crumbs
- 1/4 cup unsalted butter, melted
- 2 cups cream cheese, softened
- 1 cup powdered sugar
- 1 teaspoon vanilla extract
- 1 cup heavy whipping cream
- 1 cup mixed berries (strawberries, blueberries, raspberries)
- Fresh mint leaves for garnish
Instructions
- Prepare the Crust: In a bowl, mix graham cracker crumbs and melted butter until combined. Spoon the mixture into the bottom of serving cups and press down to form a crust.
- Make the Cheesecake Filling: In a large bowl, beat the softened cream cheese until smooth. Gradually add powdered sugar and vanilla extract, mixing until well combined.
- Whip the Cream: In another bowl, whip the heavy cream until stiff peaks form. Gently fold the whipped cream into the cream cheese mixture until fully incorporated.
- Assemble the Cups: Layer the cheesecake filling over the crust in each cup. Add a layer of mixed berries on top of the filling.
- Chill: Refrigerate the cups for at least 2 hours to set. Before serving, garnish with fresh mint leaves and additional berries.
Blueberry Galette
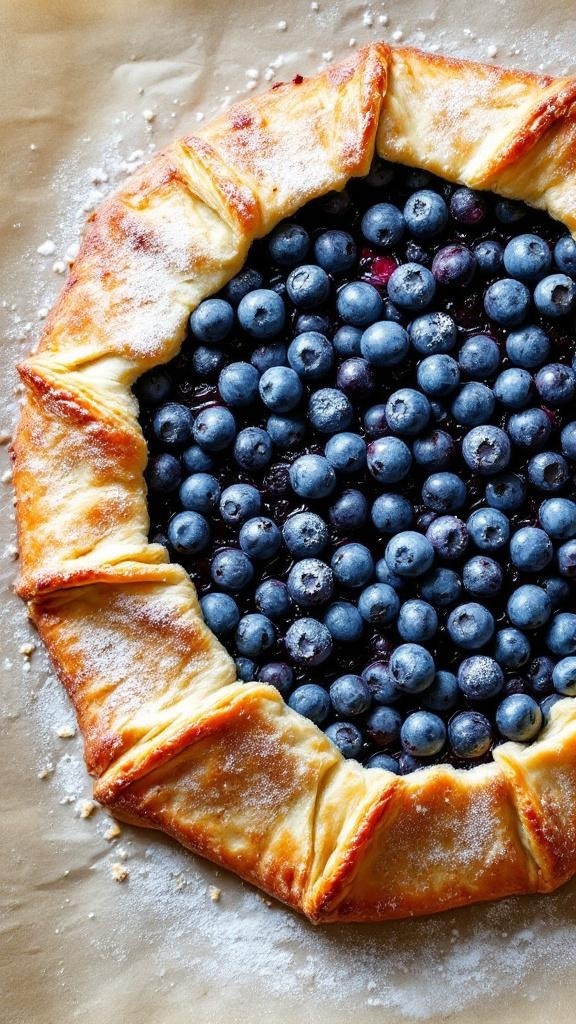
Blueberry galette is a delightful summer dessert that combines the sweetness of fresh blueberries with a flaky, buttery crust. This rustic tart is not only delicious but also simple to make, making it perfect for both novice and experienced bakers.
The juicy blueberries burst with flavor, creating a wonderful contrast with the crispy edges of the galette. Serve it warm with a scoop of vanilla ice cream or a dollop of whipped cream for an extra treat!
Ingredients
- 2 cups fresh blueberries
- 1/4 cup granulated sugar
- 1 tablespoon cornstarch
- 1 tablespoon lemon juice
- 1 teaspoon vanilla extract
- 1/4 teaspoon salt
- 1 pre-made pie crust (store-bought or homemade)
- 1 egg (for egg wash)
- 1 tablespoon coarse sugar (for topping)
Instructions
- Preheat the oven to 400°F (200°C). Line a baking sheet with parchment paper.
- In a bowl, combine the blueberries, granulated sugar, cornstarch, lemon juice, vanilla extract, and salt. Gently toss to coat the blueberries.
- Roll out the pie crust on a floured surface to about 12 inches in diameter. Transfer it to the prepared baking sheet.
- Pour the blueberry mixture into the center of the crust, leaving about a 2-inch border. Fold the edges of the crust over the blueberries, pleating as necessary.
- Beat the egg and brush it over the crust. Sprinkle coarse sugar on top.
- Bake for 25-30 minutes, or until the crust is golden brown and the blueberries are bubbly.
- Let it cool slightly before slicing. Enjoy warm or at room temperature!
Grilled Pineapple Slices
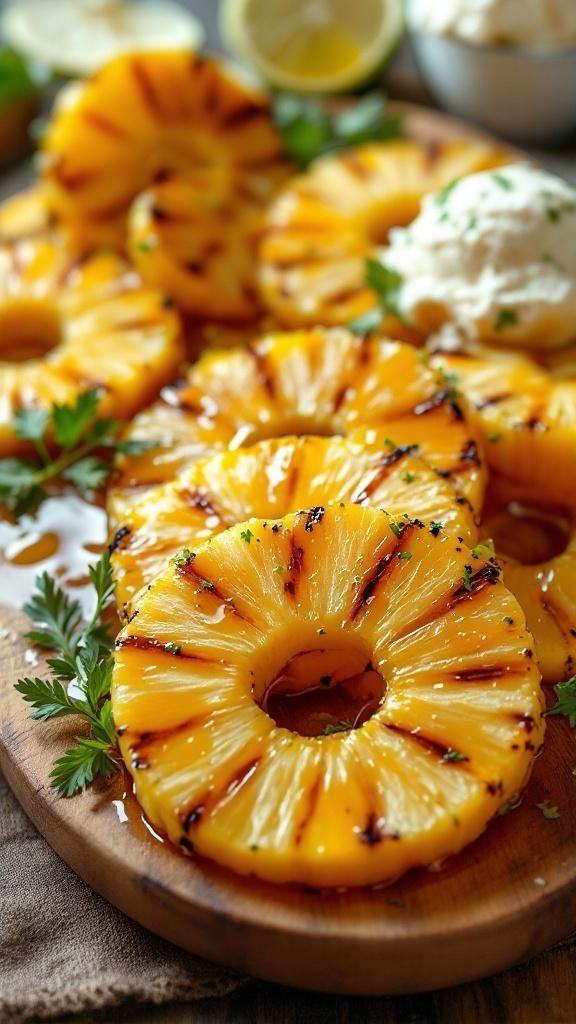
Grilled pineapple slices are a delightful summer treat that brings a burst of sweetness to your dessert table. The caramelized edges and warm, juicy center create a flavor that’s both refreshing and satisfying. Plus, this recipe is super easy to whip up, making it perfect for backyard barbecues or casual family dinners.
The smoky grill adds a unique twist to the natural sweetness of the pineapple, enhancing its flavor. Serve these slices with a scoop of vanilla ice cream or a dollop of whipped cream for an extra special touch. You’ll love how simple and delicious this dessert is!
Ingredients
- 1 ripe pineapple, peeled and sliced into rings
- 2 tablespoons brown sugar
- 1 tablespoon honey
- 1 teaspoon cinnamon
- 1 tablespoon lime juice
- Butter or oil for grilling
- Vanilla ice cream or whipped cream (optional, for serving)
Instructions
- Prepare the Grill: Preheat your grill to medium heat and lightly grease the grates with butter or oil.
- Mix the Topping: In a small bowl, combine brown sugar, honey, cinnamon, and lime juice. Stir until well mixed.
- Coat the Pineapple: Brush the pineapple rings with the sugar mixture, ensuring they are evenly coated.
- Grill the Pineapple: Place the pineapple rings on the grill. Cook for about 3-4 minutes on each side, or until grill marks appear and the pineapple is heated through.
- Serve: Remove from the grill and serve warm, topped with vanilla ice cream or whipped cream if desired.
Strawberry Icebox Cake
Strawberry Icebox Cake is a delightful and refreshing dessert perfect for summer. This no-bake treat combines layers of fresh strawberries, creamy whipped topping, and crunchy graham crackers. It’s light, sweet, and bursting with flavor, making it a favorite for warm days.
Not only is it delicious, but it’s also super easy to make. With just a few ingredients and minimal prep time, you can whip up this cake in no time. It’s a great way to impress guests or simply enjoy a sweet treat at home!
Ingredients
- 2 cups heavy whipping cream
- 1/2 cup powdered sugar
- 1 teaspoon vanilla extract
- 2 cups fresh strawberries, sliced
- 1 cup graham cracker crumbs
- 1 cup blueberries (optional, for garnish)
Instructions
- In a large bowl, whip the heavy cream until soft peaks form. Gradually add powdered sugar and vanilla, continuing to whip until stiff peaks form.
- In a serving dish, layer half of the graham cracker crumbs at the bottom.
- Spread half of the whipped cream over the crumbs, then add half of the sliced strawberries on top.
- Repeat the layers with the remaining graham cracker crumbs, whipped cream, and strawberries.
- Cover and refrigerate for at least 4 hours or overnight to allow the flavors to meld.
- Before serving, top with blueberries for a pop of color and extra flavor.
Cherry Clafoutis
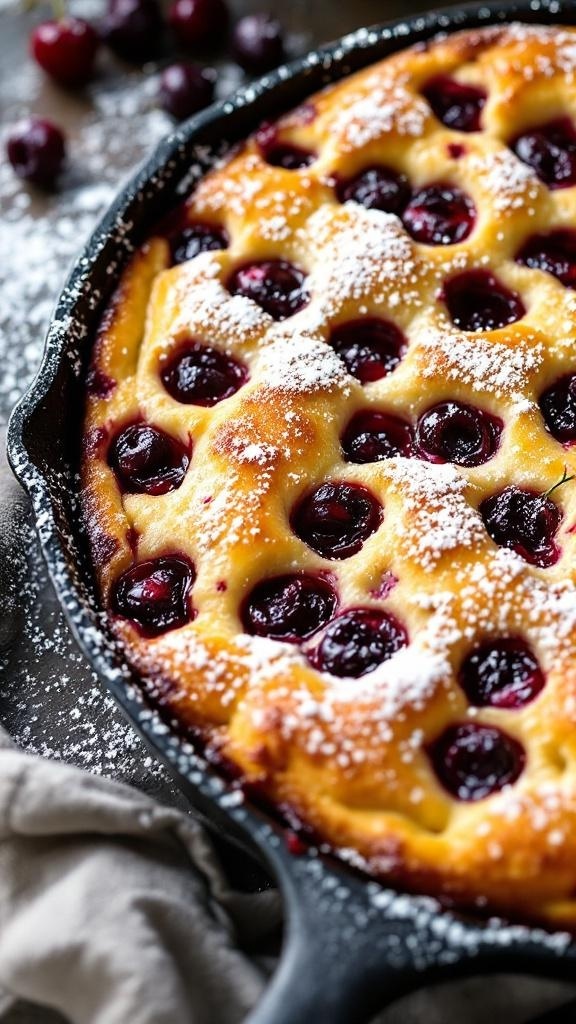
Cherry Clafoutis is a delightful French dessert that combines fresh cherries with a simple batter, creating a custard-like treat that’s perfect for summer. The sweet and slightly tart cherries pair beautifully with the fluffy, baked batter, making each bite a burst of flavor. Plus, it’s super easy to whip up, so you can enjoy this treat without spending hours in the kitchen!
This dessert is not only delicious but also visually appealing, with the cherries peeking through the golden crust. Serve it warm or at room temperature, dusted with powdered sugar for a touch of elegance. It’s a fantastic way to showcase summer cherries and impress your friends and family!
Ingredients
- 2 cups fresh cherries, pitted
- 3 large eggs
- 1 cup milk
- 1/2 cup granulated sugar
- 1 teaspoon vanilla extract
- 1/4 teaspoon salt
- 1/2 cup all-purpose flour
- 2 tablespoons unsalted butter, melted
- Powdered sugar for dusting
Instructions
- Preheat the oven to 350°F (175°C). Grease a 9-inch round baking dish or cast-iron skillet.
- Spread the pitted cherries evenly in the bottom of the prepared dish.
- In a mixing bowl, whisk together the eggs, milk, sugar, vanilla extract, and salt until well combined.
- Gradually add the flour, mixing until smooth. Stir in the melted butter.
- Pour the batter over the cherries in the dish.
- Bake for 35-40 minutes, or until the clafoutis is puffed and golden brown.
- Let it cool slightly before dusting with powdered sugar. Serve warm or at room temperature.
Mixed Berry Crisp
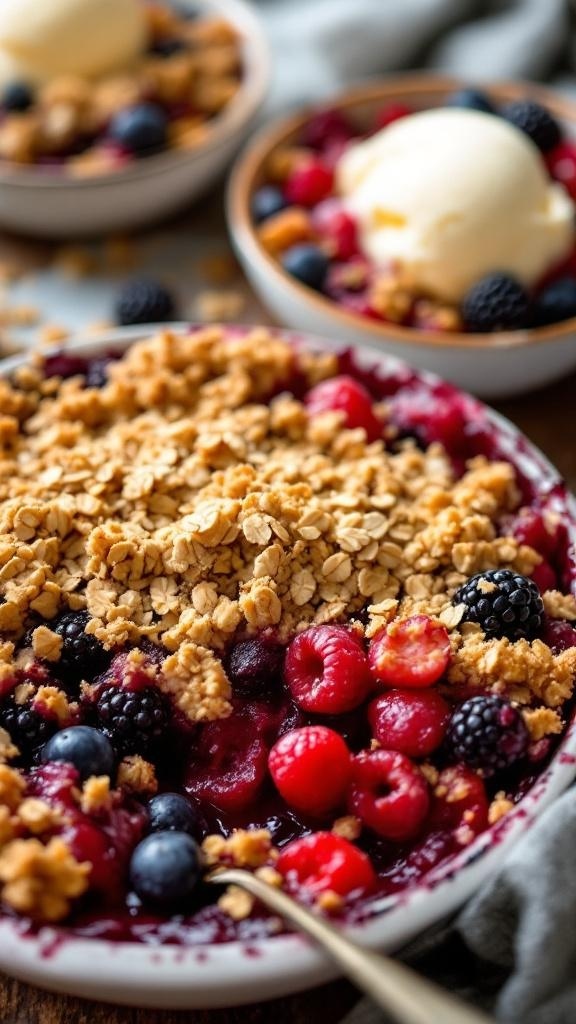
Mixed Berry Crisp is a delightful dessert that combines the sweetness of fresh berries with a crunchy oat topping. It’s a simple recipe that brings out the best flavors of summer, making it perfect for warm evenings. The combination of juicy berries and a golden, buttery topping creates a treat that’s both comforting and refreshing.
This dessert is not only easy to whip up, but it also allows for some creativity. You can use any mix of berries you have on hand, whether it’s strawberries, blueberries, raspberries, or blackberries. Serve it warm with a scoop of vanilla ice cream for an extra special touch!
Ingredients
- 2 cups mixed berries (strawberries, blueberries, raspberries, blackberries)
- 1/4 cup granulated sugar
- 1 tablespoon cornstarch
- 1 teaspoon vanilla extract
- 1 cup rolled oats
- 1/2 cup all-purpose flour
- 1/3 cup brown sugar, packed
- 1/2 teaspoon ground cinnamon
- 1/4 cup unsalted butter, melted
Instructions
- Preheat the oven to 350°F (175°C).
- In a mixing bowl, combine the mixed berries, granulated sugar, cornstarch, and vanilla extract. Toss gently to coat the berries.
- Transfer the berry mixture to a baking dish, spreading it evenly.
- In another bowl, mix the rolled oats, flour, brown sugar, and cinnamon. Pour in the melted butter and stir until the mixture is crumbly.
- Sprinkle the oat mixture over the berries, covering them evenly.
- Bake for 25-30 minutes, or until the topping is golden brown and the berries are bubbling.
- Let it cool slightly before serving. Enjoy warm with a scoop of ice cream!
Mango Sorbet
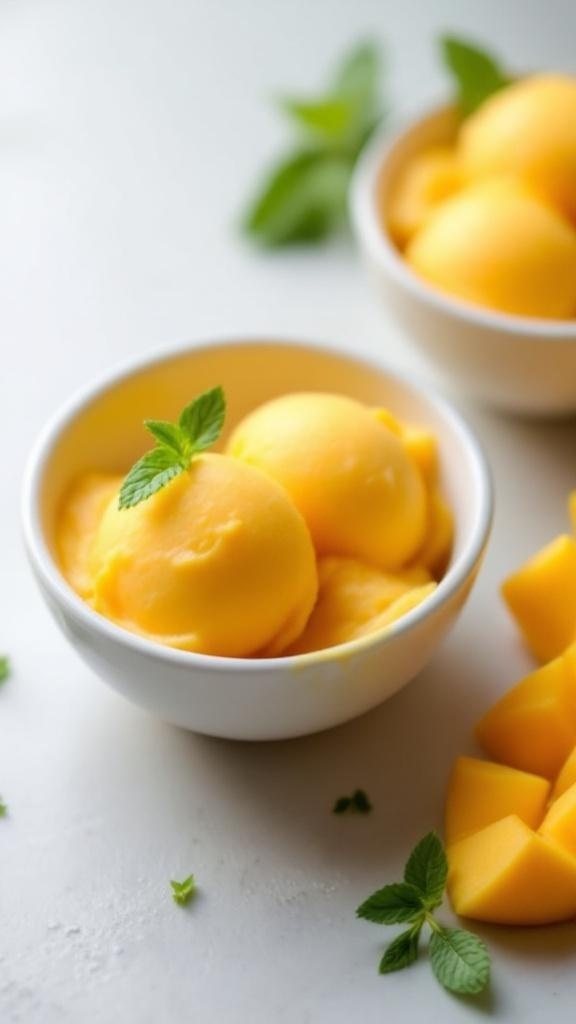
Mango sorbet is a refreshing treat that captures the essence of summer in every bite. With its sweet and tangy flavor, this dessert is perfect for cooling off on a hot day. Plus, it’s super easy to make, requiring just a few simple ingredients!
This sorbet is not only delicious but also a healthier alternative to ice cream. The vibrant color and smooth texture make it a delightful addition to any summer gathering. Enjoy it on its own or as a topping for other desserts!
Ingredients
- 4 ripe mangoes, peeled and diced
- 1/2 cup granulated sugar
- 1/2 cup water
- 1 tablespoon lime juice
Instructions
- Prepare the Syrup: In a small saucepan, combine sugar and water. Heat over medium heat, stirring until the sugar dissolves. Remove from heat and let it cool.
- Blend the Mango: In a blender, combine the diced mangoes, cooled syrup, and lime juice. Blend until smooth.
- Chill the Mixture: Pour the mango mixture into a shallow dish and place it in the freezer for about 2 hours, stirring every 30 minutes until it reaches a slushy consistency.
- Final Freeze: Once the mixture is slushy, transfer it to an airtight container and freeze for an additional 2-3 hours until firm.
- Serve: Scoop the sorbet into bowls and enjoy your refreshing mango treat!
Coconut Cream Pie
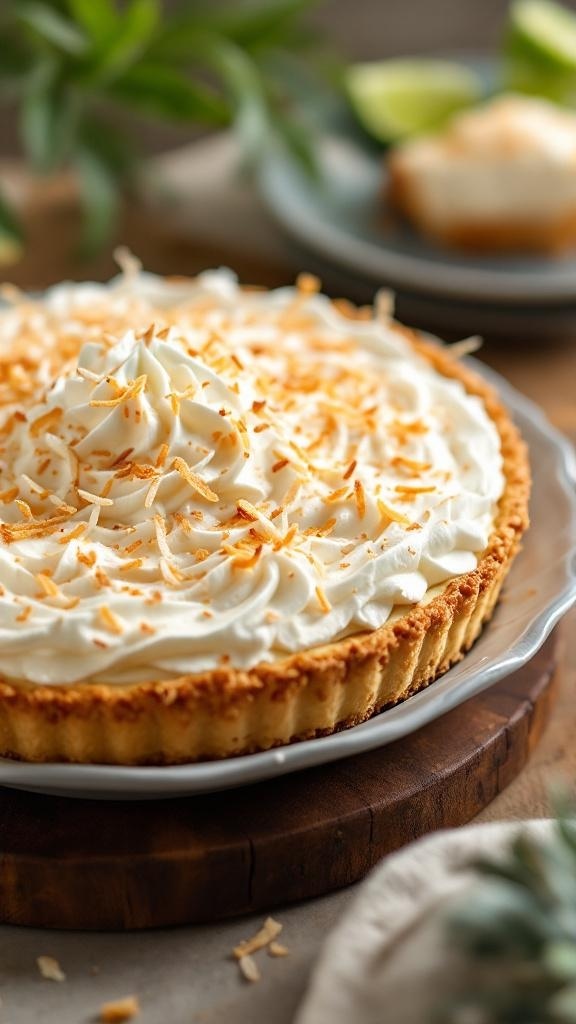
Coconut cream pie is a delightful treat that brings the taste of summer right to your table. With its creamy coconut filling and a light, fluffy topping, this pie is both refreshing and satisfying. It’s simple to whip up, making it a perfect choice for gatherings or a sweet ending to a warm day.
The combination of sweet coconut and rich cream creates a flavor that is hard to resist. Topped with toasted coconut flakes, this pie not only tastes great but also looks beautiful. Whether you’re a seasoned baker or just starting out, this recipe is easy to follow and sure to impress!
Ingredients
- 1 pre-made pie crust
- 1 cup sweetened shredded coconut
- 1 cup heavy cream
- 1 cup coconut milk
- 3/4 cup granulated sugar
- 1/4 cup cornstarch
- 1/4 teaspoon salt
- 4 large egg yolks
- 1 teaspoon vanilla extract
- 1 tablespoon unsalted butter
- Whipped cream, for topping
- Toasted coconut flakes, for garnish
Instructions
- Preheat the oven to 350°F (175°C). Bake the pie crust according to package instructions until golden brown. Let it cool.
- In a medium saucepan, combine coconut milk, heavy cream, sugar, cornstarch, and salt. Whisk together over medium heat until the mixture starts to thicken.
- In a separate bowl, whisk the egg yolks. Gradually add a small amount of the hot mixture to the yolks to temper them, then return the yolk mixture to the saucepan.
- Cook for another 2-3 minutes, stirring constantly until thick. Remove from heat and stir in vanilla extract and butter.
- Fold in the shredded coconut and pour the filling into the cooled pie crust. Refrigerate for at least 4 hours, or until set.
- Before serving, top with whipped cream and sprinkle toasted coconut flakes on top for garnish.